COMPUTER CORNER
Budget Computing & Computing for beginners
Not everyone has the computer skills to fix things when they go wrong, or can afford to buy the expensive software which makes a basic computer usable and productive.
On these pages we try to offer advice on how to maintain your computer using free or low priced maintenance tools, and suggest free alternatives to the expensive programs that make the computer do what we require it to do.
We do not all have endless cash resources at our disposal, computers can cost lots of money leaving little to pay for the many accessories and software required to make them productive.
In this section we try to offer ideas for cheaper oe even free alternatives.
Computers are far from cheap, they can easily swallow up our savings and empty our pockets, but the costs do not stop on its purchase,
The computer on its own can do very little, it needs peripherals such as printers and scanners, and it needs various software (programs) for it to perform the various tasks we require, and it is these programs can cost a small fortune.
The software programs we need depends on what we intend to do on our computer, this maybe office based work such as word-processing, working with spreadsheets and creating presentations, or it might be to edit video or photographs. The 'industry standard' programs can often run into many hundreds of pounds and be way out of our financial reach, but luckily there is a lot of 'Freeware' or 'Shareware' available, cheaper or even free programs which are fully compatible, just as powerful, and have most if not all of the functions of the expensive software.
Below are links to some of these free alternative programs.
THE INDUSTRY STANDARD : Comes with Wordprocesor, Spreadsheet, Database, Presentations.
Very expensive to purchase outright or pay for monthly use.
The alternatives below are free.
THE INDUSTRY STANDARD: When it comes to creating anything graphical, Photoshop is the program the professionals turn to. But it comes with a hefty price which is beyond most of us. There are 'cut-down' versions offered in the app stores, and even some 'time-limited' options. But there are also some good cheaper alternatives that will do most of the things we ould need as shown below.

Many people create websites by writing them from scratch using HTML, but when it comes to website design using software, Dreamweaver has been the top name for many years.. There are now many 'Bootstrap' style programs that create website using pre-made blocks like Mobirise, but tradditional HTML software is still available.
We are at a time where most of the population have grown up with computers, but there are still some who did not have computer training within their school years and only now need to face computers for the first time. With everything now going online from banking to shopping, and the requirement to complete any government or official forms or applications forms using the internet, there are many who have been forced to adapt to the online and computer world.
There are many training courses available, plus many self-help books, but these often take it for granted you know some of the basics which add stress to the learning curve. In this section we try to explain some of the basics.
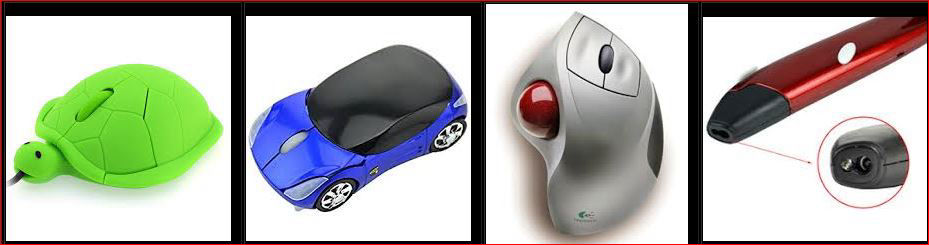
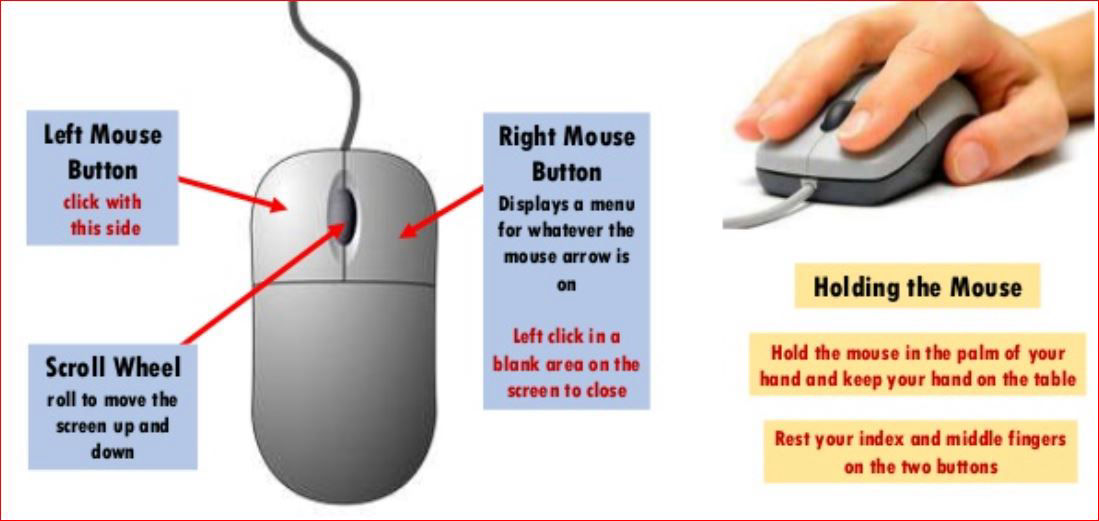
Mice can come in a variety of styles and types, most modern mice are 'Optical' using a laser light underneath to track movement, but there still are some 'Analaogue' mice around and these have a small roller-ball underneath. Optical mice are far more accurate. Older mice came with just two buttons, most now have three including the button built in to the wheel, some designed mainly for gaming have many more including a roller-ball.
Mice can be 'Wired' which have a cable attached to the USB port of your computer, or 'Wireless' which have no leads.
The Left button is also used to 'Highlight' items or text. Clicking the left button and holding it down and then moving the mouse across the object to the far side before releasing the button will highlight the object or text, then whilst the cursor is positioned over this the Right button can be used to open the options (copy / delete etc.).
Modern 'Optical Mice' (those that have a light underneath) need a well defined surface to work well on, they will not work effectively if used on a glass or highly reflective surface, they will either be very jumpy or refuse to move altogether. Use a proper mouse-pad or stick a sheet of thick paper or card on a glass or shiny surface to improve movement accuracy (better if it has lines, or a pattern).
Those new to using a mouse or computer can at first find it very frustrating when trying to place the cursor in an exact position on the screen, as you press the top buttons or change body position the cursor can jump and select something completely different. There is a secret to this, hold the mouse on each side with thumb and little finger, keep index finger on the left button and middle finger on the right. When you have moved the on-screen cursor to the required position, whilst still gripping it tightly push your outer two fingers firmly downwards towards the mat or hard surface, this friction from your fingers will stop the mouse from moving as you press the buttons.

What is 'Cut & Paste' and when would I need to use it?
For years layout specialists for newspapers and magazines have used a system called "Cut & Paste", we too have most probably done this ourselves at a basic level either whilst at School or at home, most people have made a "Scrap Book" of some form sometime during their lives, using scissors to cut out text and pictures from a magazine or newspaper then needing to jiggle them around to make them fit onto a page before we used paste to stick them into position. We can still do this now on a computer, we now have additional functions called "COPY"; "MOVE"; PASTE" and "DELETE" at our disposal, this makes it easier and much quicker to either move, delete or copy large blocks of Text or even pictures to a different location in our documents.
There can be many reasons for us to use these two techniques, removing unwanted text or graphics or moving them to another location within the document, even copying them into a different document altogether. But before we can use Cut & Paste we have to understand how to highlight. the item we wish to move.
As you move over various items on the screen the flashing cursor can change, the arrowhead õ which is normally used for selection can indicates what is available, it can change to a crosshair ° or + sign, or a rotating egg timer if the computer is busy. When editing a text document it will change to an I-bar. It is this I shaped cursor you will use to highlight the text you wish to work on.
Move the I-beam cursor to the space just before the first letter of the word, click and hold down the Left mouse button, then slowly move to the end of the word or sentence you wish to highlight, as it highlights it will reverse the colours so that you can see. If there is a large block of text you wish to move then move the cursor downwards to the gap at the end of the last word, releasing the Left button will now set it.
Sometimes it is very difficult to locate the I-beam cursor at the beginning of the text, especially if this is close to a border or a picture, It can be easier and more accurate to start at the end of the text and drag the mouse backwards to the gap before the first letter before releasing button.
'CUT' : Choosing cut will delete selected text from original location.
'COPY': Choosing copy will leave original text in position but hold a copy in memory.
'PASTE': Choosing paste will insert the copied text into a new position.
Using Cut or Copy places the selected text into the computers memory (Clipboard) ready to be used elsewhere.
Now move the cursor to the new location within your document where you wish to place the text, locate the gap before any existing text and click the Left mouse button to place the cursor in place, now click the Right mouse button and choose "Paste", this will insert the text you saved to memory.
It is possible to replace a block of text with text stored in memory. When you have copied your text as detailed above, move to the new location and highlight the text you wish to overwrite, click the Right mouse button but instead of deleting or copying select "Paste", this will then replace the highlighted text with the new.
CLICKING:
More modern software and operating systems sometimes enable another option to highlighting. Using the Left mouse button click twice on the word you wish to highlight, or three times to highlight the paragraph.
RUBBER BANDING:
Sometimes it is a picture; photograph or a table that we need to move or delete from our document, to do this we use a technique known as 'Rubber - Banding'. Place the cursor above and to the top left of the item, click and hold down the Left mouse button and move the cursor below and to the right of the item before releasing, this should draw a square around the picture showing we have highlighted it. Dependant on the software and operating system this can either be a dotted line ----- or it may invert the colours. Now use the Right mouse button to choose whether to "CUT" or "COPY" and place it in the clipboard memory, this can then be placed elsewhere as described above using "PASTE".
Without getting too complex, a cache is made up of copies, for example:- each time you visit a webpage a 'snapshot' of that page is saved to your cache file, so that if you return to that page the computer can quickly display it without having to first download it again. Other things are also 'Cache'd' and gradually these cache files fill up and increase in size to a point they slow down your computer. They can also cause problems when they do not overwrite information, the page may have changed but the cache may still display the older version. So the Cache needs to be manually cleared out frequently to keep your machine running effectively.
Your computer is not alone when it comes to having a Cache, Routers too often create cache files, and as they fill up can affect your access to the internet. These need to be cleared frequently by turning the router off at the mains, leaving disconnected for a few minutes then restarted. Do this once a week.
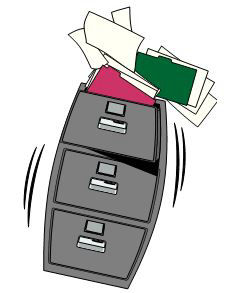
Computer Directories [folders] can be sub-divided as many times as required, each new folder can then hold Computer Programs, Data [information], or even include further sub directories. Just like the picture on the right, computer folders can be tucked inside other computer folders. We just have to learn in which order they are kept.
EXAMPLE:
The top drawer of your three door filing cabinet holds information relevant to your Home and Household. We could call this drawer “HOME”
The second drawer holds information relating to your Hobbies. So we could call this “Hobbies”.
The bottom drawer holds information relevant to your business. Therefore we shall call this folder “Business”.
Within this third drawer there are several dividers, splitting the contents into further groups, e.g. Banking / Legal / Customers / Products. If we look in the folder labelled "Banking", we can see that this too contains further folders labelled “Bills” / “Accounts”. In each of these folders are the documents relating to that specific subject, these documents, Letters, Pictures or information sheets {DATA} are the lowest level of the filing system.
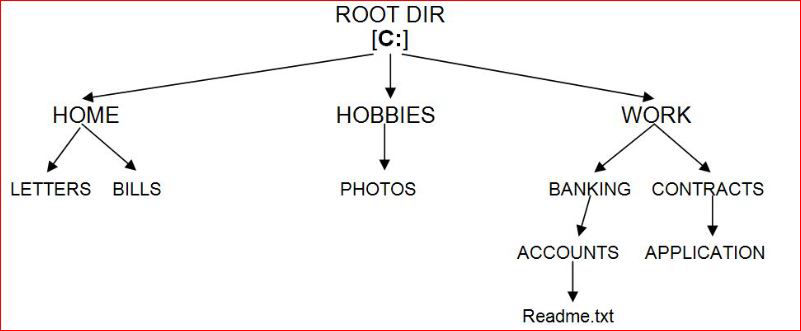
Another way to picture this system is to think of a upside down tree:-
The cabinet or "Root Directory" resembling the Trunk.
1st Level Sub-Directories or "Dividers" resembling the main Branches.
2nd Level Sub-Directories or "Folders" resembling the smaller branches.
3rd, 4th, 5th etc. Level Directories resembling twigs.
Documents, Program files etc., resembling the Leaves.
JUST AS WE AS PEOPLE NEED A MAP OR LIST OF DIRECTIONS TO BE ABLE TO FIND SOMEWHERE NEW, A COMPUTER NEEDS A PATH TO FOLLOW TO FIND PROGRAMS OR DATA !
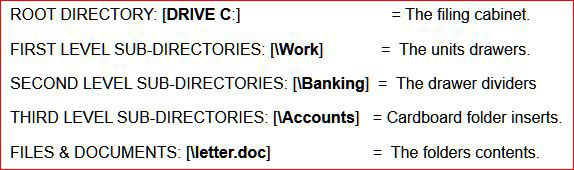
We use what is known as a "Path" to tell the computer where to find or save a file, using the above as an example imagine trying to find a letter called "Readme.txt" which is stored in the folder named Accounts. We would give a path as follows:-
C:\WORK\BANKING\ACCOUNTS\Readme.txt
The file “Readme.txt” is therefore stored in the third drawer named [\work], then inside the divider named [\banking], then inside another folder named [\Accounts]. The last part of the Path statement should then correspond to the actual name of the file, [\readme.txt].
Using the "TREE" as a directory structure, the folder we are looking for would be placed as in the diagram

IF YOU KNOW WHERE TO PUT IT -
YOU WILL ALSO KNOW WHERE TO FIND IT !
I use and teach others a method to store data using what I call the "ZDATA" system. Although this is my method and specific to my way of training, it provides a logical way of locating files, adds security to the system in general, and it also makes back-up procedures very much easier to undertake. If you buy your own PC or are the only user of the machine, then you have the option of setting it up to match this system, or to use it’s principles in your own system.
With most modern software, you have the option of setting your "Preferences" as to where files are stored. Older software may not easily allow you to do this, it may even force you to store data within the set system directories or the Program directory itself, If this is so, it is still possible to use the "ZDATA" system, but files will need to be manually copied or moved into its filing structure after they have been saved by the program. This really only applies to software created before the general use of Windows™, most software complies now with the newest operating system windows 10 and defaults to the 'Document' folder which can be changed in the settings.
One of the reasons I use this method, especially on newer style Windows machines, is that they can now use long filenames and no longer require the use of the three identifiers, e.g. “.txt”. If you was in the wrong folder when you saved a letter, and the letter was named the same as a file that was an important part of a program, then this would be obliterated upon saving it and would then prevent the program from working at all. Imagine the problems if you were in the main Windows folder, this may even prevent your machine from starting up or working properly, a difficult situation to be in if you do not understand computers very well, possibly quite an expensive error to have put right too.
Try to get into the habit of naming your file before you work on it, for example, when you open a new Word document, immediately click the “File” menu and then select “Save As”, check that is in the selected directory where you wish the file to be stored, if not enter the chosen path {or “Browse” until it is highlighted}, and then give the file a suitable (easily recognisable) name and press “SAVE”. Your untitled document will immediately be renamed, from then on you only have to click the “Save” Icon to store it in the correct place. If the software has an “Auto-Save” feature, then the computer will also save it in the right directory.
Suitably naming the files is very important.
For instance Photographs that are uploaded from digital camera' or mobile phones are allocated sequential numbers, e.g. DC10000000234. DC10000000235. This is great until you want to find the picture of your child's 3rd birthday party, then it is like trying to find a needle in a haystack.
Design your directory structure layout on paper first, if possible at the time you first set-up your machine, It will save you a lot of copying and moving of files later. and you will not misplace those important letters or photographs that you need to see urgently.
Rather than use the embedded default folders to store my files, I open up my main drive (C:) and create a single folder called 'ZDATA'. (right click on a blank area inside the folder window and select 'New', then select 'Folder, name it ZDATA').
I then move in the 'ZDATA' folder and create sub-folders, e.g. 'HOME'; 'WORK'; 'CAR'; 'BOOKS'; 'MUSIC'; 'PHOTOGRAPHS'; 'VIDEOS'. etc.
Each of these can then be sub-divided further into more defining groups similar to the structure shown above, as in the case of photographs my folder is sub-divided into folders for each of my family members; friends; holidays; events etc., so that i can easily locate specific photographs relevant to an event or person.
Now you can sort out your photographs; music or letters and move them into their new appropriate folders.
I then create a shortcut to this folder on my Desktop, that way it is always to hand and can be opened with just one click. (right click and hold on the folder icon, drag to blank area of desktop and release, then choose 'make shortcut').
The advantages of doing it this way come to light when trying to back-up your valuable information to an external disk, by dragging just the one folder across onto the drive letter pertaining to the external drive or DVD it will copy ALL of your data, and in the process keep it in the same structure. Then if you ever need to re-install the data to the computer the reverse is done still maintaining the structure you have made.
Windows 10 computers use a folder called 'Downloads' as a default for items you upload from phones or camera's, pictures you save or programs you may download to install. I also have a shortcut to this folder on my desktop made in the same way as above. By opening my DATA folder on one side of my screen and the Downloads folder on the other, it simplifies the moving the files across into the appropriate folders.
Make a point of doing 'Disk Housework' regularly, move the files across as they are made to save lots of work later.
Why call it 'ZDATA' ?
This really goes back to when I used older computers, computers list things in alpa-numeric order, this moved the data folder to the end of the list away from everything else. it also meant that it placed it after the system files on the disk, so when I performed my disk maintenance such as defragmentation and optimising the disk it was all kept together and therefore speeded up the operation. I actually now use a folder called just 'DATA', Your folder can be called anything you choose, e.g. ' DATA'; 'A-DATA' 'MYSTUFF' etc., the principles will still work and it will still be easier to make back-up's. Each new back-up will overwrite older data on the external disk with the new.
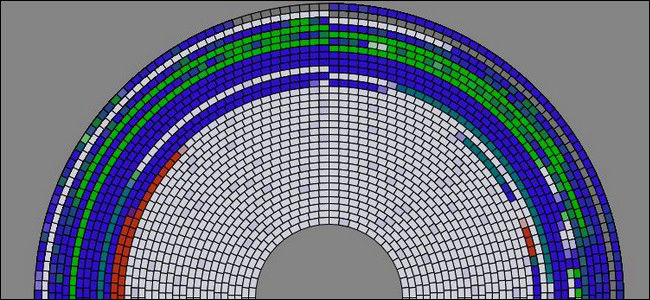
A computer hard disk is basically the same as a CD / DVD disk, it stores its information sequentially, in small blocks.
The information (Data) we save to it can take up just one or many of these small blocks.

It slowly fills up the disk writing one block after the other (Blue blocks). But when we delete Data, it erases those blocks (Red blocks).
If new information we want to save will fit into the first 'empty' set of blocks then it will partly fill the gaps.
If the new information is larger than the first empty blocks it finds, then it is moved to the end of the disk (White blocks).
Troubles begin when there is not enough 'Free' area at the end of the disk to place the new data, errors will occur saying there is insufficient room to save the file. Even though the disk is not full.
Defragmentation shuffles all these blocks around, re-writing them one after the other and placing them close together, moving the free 'empty' areas to the end of the disk which will then allow the computer to save your file..
It all sounds complicated, but don't panic Windows has its own built in program that you can call up to do this for you. 'Defragment & Optimise Drives'.
But there are many other software programs available that will also do this better, and at the same time do other much needed maintenance to your computer and to your storage disks.
'IO-Bit's offer a free suite of easy to use programs that once loaded work behind the scenes monitoring your computer. Downloading all these will enable you to regularly Defragment the disk, clear cache files, clean unwanted temporary files, and to update necessary drivers and software etc.
Credit to: Learn iT! Training